Connection with Victron VE.Direct
What is it about?
Victron has become an indispensable part of the VAN sector. It would therefore be nice to receive the data from the devices not only via Bluetooth, but also via USB/Uart, in order to display and use them in different places. In this Tutorial on an MPPT solar controller, but the principle is the same for all Ve.Direct devices.
Serial communication as a basis.
First of all, you should know what a serial connection is. This is often referred to as a UART with the RX and TX. Ve.Direct is no different from a UART from a hardware perspective. However, it should be noted that different devices use 5V or 3.3V levels. This is something to bear in mind for later use (our Ve.Direct cable has an integrated level converter so that both voltages can be used without any problems). If you want to read the data directly via the GPIO pins of a Raspberry PI, for example (the RPI4 has 5 UARTs), you have to make sure that only a 3.3V level arrives there. If you want to use the whole thing on a PC or other device, you can of course also use a USB-serial adapter to create a serial port. (COM for Windows/ ttyUSB Linux) Pin assignment
Source: https://beta.ivc.no/wiki/index.php/Victron_VE_Direct_DIY_Cable
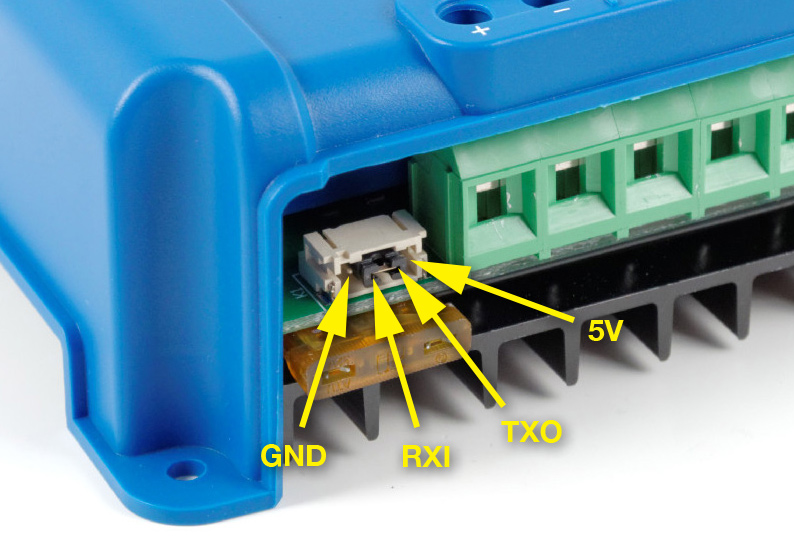
On the output of the MPPT solar controller, the two necessary RX and TX lines are in the middle. On the outer PINS we have the GND and 5V lines. Since we have 5V, we also know that we are dealing with a 5V level has.
When we use the data lines we have to remember that we always have to connect RX to TX and TX to RX. (Transmitter must be connected to receiver)
Look at the link in the picture. Everything hardware-related is well summarized there.
However, the interface supplies almost no power. Unfortunately, you cannot operate an ESP8266 or similar on it.
read data
Now that we have established the hardware connection, we need to read out the data.
In Windows, we can receive the data very easily using a serial terminal. (We recommend Docklight). There we set the COM port of the USB serial cable. The parameters for the interface are 19200 with 8N1 (standard). If we now open the interface, we receive an ASCII string with the device's parameters every second. There you can see the data and see whether it contains the things you need. Using the normal string editing function (split, parse, substring) you can now find the values you need. You can also find all the information you need about the interfaces on the Victron Energy website. www.victronenergy.com
VanPi Backend
The processing takes place in VANPI (1.1.0) as follows.
1. We configure the interface using the connection flow. This is an input from the web interface (frontend) in which you set which device is connected to which USB port. The baud rate and routing are then set there. All settings are also saved for a restart. If you now want to see directly whether data is arriving at the USB, simply attach a debug node. The switch is the router to the respective flows and the link nodes forward the data.

Connections FLOW
2. Evaluating the strings coming from the VE.Direct device

In the flow VE.Direct The data now arrives as a string, but we first have to find out the device class. We do this using the PID. Now that we know what type of device is connected, we sort the data according to the order in which it is separated in the string by "\n" line breaks. After that, the data is only forwarded to the corresponding displays and written into the global variables. The UI CONTROL node ensures that the Victron pages and information are only displayed when data is received.
3. In the Flow Sensor Dashboard, for example, the shunt battery data is then copied into the global variables for the "Main" battery data. This step is important for systems with multiple battery data sources (e.g. PekawayShunt, Victron Shunt, BMS). For the display on the touchscreen, IOT Bridge and the info page, we need, or want, the most trustworthy data. That's why we select this in the System Config under -> System-> MainBattData.
